Due to the amount of differences between BigSky and BigSkyMX, presets from the original BigSky are not able to be loaded into BigSkyMX.
Financing Available Through ![]()
Free US Shipping On Orders Over $49
Easy 30-Day Returns
Financing Available Through ![]()
Utility to organize your presets and manage impulse response reverb files for the IMPULSE reverb machine on BigSky MX.

Due to the amount of differences between BigSky and BigSkyMX, presets from the original BigSky are not able to be loaded into BigSkyMX.
Each of our Strymon digital effect pedals (excludes OB.1) have the ability to be used with mono or stereo connections. Here are 3 different connection setups you can use with these pedals.
Mono Input => Mono Output
For Compadre, Riverside, and Sunset: Connect a standard mono TS instrument cable into the INPUT and connect a mono TS instrument cable to the OUTPUT of the pedal.
For blueSky and Ola: Connect a mono TS instrument cable into the LEFT INPUT and LEFT OUTPUT for a mono connection.
For BigSky, BigSkyMX, Mobius, NightSky, TimeLine, and Volante: Connect a mono TS instrument cable into the LEFT INPUT and LEFT OUTPUT for a mono connection. On the TimeLine and Mobius ONLY, make sure that the switch on the back of the pedal is set to STEREO IN/OUT.
For all other Strymon two footswitch Strymon pedals (including Iridium, Zelzah, and V2 pedals with mono/ stereo switch), connect a standard mono TS instrument cable into the INPUT and connect a mono TS instrument cable to the LEFT OUTPUT of the pedal.
Mono Input => Stereo Output
For Mono INPUT and Stereo OUTPUT on our small 2 footswitch pedals: Connect a standard mono TS instrument cable into the INPUT and connect a mono TS instrument cable to both the LEFT and RIGHT OUTPUTS of the pedal. (excludes Compadre, Riverside, and Sunset)
For blueSky and Ola: Connect a mono TS instrument cable into the LEFT INPUT and a mono TS instrument cable to both the LEFT and RIGHT OUTPUTS for stereo output.
For BigSky, BigSkyMX, Mobius, NightSky, TimeLine, and Volante: Connect a mono TS instrument cable into the LEFT INPUT and both LEFT and RIGHT OUTPUTS for stereo output. On the TimeLine and Mobius ONLY, make sure that the switch on the back of the pedal is set to STEREO IN/OUT.
Stereo Input => Stereo Output
For Stereo input and Stereo output on our small 2 footswitch pedals (except V2 pedals, Iridium, Zelzah, blueSky and Ola), you must first open up the pedal to move the internal jumper over the LEFT 2 pins to set the pedal for TRS Stereo input.
Once the pedal is set for TRS Stereo input, make sure to use a TRS Stereo cable into the INPUT and connect a mono TS instrument cable to both the LEFT and RIGHT OUTPUTS of the pedal.
For blueSky and Ola: Connect a mono TS instrument cable into the LEFT and RIGHT INPUTS along with both LEFT and RIGHT OUTPUTS for stereo input and output. The internal jumper on these pedals does not need to be adjusted to work in stereo and should be left in its default position (connecting the left 2 pins when viewed from below).
For BigSky, BigSkyMX, Mobius, NightSky, TimeLine, and Volante: Connect a mono TS instrument cable into the LEFT and RIGHT INPUTS along with both LEFT and RIGHT OUTPUTS for stereo input and output. On the TimeLine and Mobius ONLY, make sure that the switch on the back of the pedal is set to STEREO IN/OUT.
For V2 pedals, Iridium, and Zelzah: Using a TRS -> dual TS cable, connect the TRS stereo cable into the input of the pedal, and a mono TS instrument cable to both LEFT and RIGHT OUTPUTS of the pedal. You will need to flip the switch on the back panel of the pedal from MONO to STEREO to enable stereo input.
We have tested the Moog EP-2/EP-3, Mission Engineering EP-1 and EP-25K, and they will all work with our pedals to varying degrees. (There may be others but we haven’t tested them yet.)
For best performance, we recommend using expression pedals that have a minimum 25k ohm or higher potentiometer such as as the Moog EP-3 or Mission Engineering EP-25k.
Performing the Reset Presets action restores all BigSky MX factory presets.
With BigSky MX currently powered off, press and hold both the A & INFINITE footswitches while connecting the power adapter—keep holding the footswitches until the RESET PRESETS – DO NOT TURN OFF message appears, then release the footswitches.
BigSky MX will power cycle itself. Once BigSky MX has powered back on, it is ready for use.
To return all Global Settings to their factory default values, disconnect the power from BigSky MX, then hold the TYPE encoder while connecting power until you see the RESET GLOBALS message appear on the display. BigSky MX will automatically restart and then be ready for use with all its original factory Global Settings.
To load an IR into your BigSky MX, follow the below instructions:
Download the free Strymon Nixie 2 application for macOS or Windows computers.
Connect BigSky MX to your computer’s USB port and launch Nixie 2
Click the IR Manager button from the Nixie 2 – Parameter Panel at the bottom of the screen
At the top of the BIGSKY MX panel, click the New Folder button to create at least one custom folder into which can import your IR files.
Within the MAC MEMORY or WINDOWS MEMORY panel at the left of the IR Manager window, browse to the folder where your reverb IR files are stored on your computer.
Select the IR file(s) you wish to import and drag and drop into your custom folder within the right BIGSKY MX panel.
You can also create additional folders and drag individual IRs and folders within the BIGSKY MX panel to move and arrange them however you like.
When you next enter the BigSky MX pedal’s Impulse parameter menu, you’ll have access to your added custom IRs and folders.
NOTE: For import of IR files, BigSky MX will accept mono or stereo .WAV files, 16 or 24 bit, and 48kHz sample rate. Upon import, Nixie 2 will conform IRs to the native format (stereo, 24-bit, 48kHz).
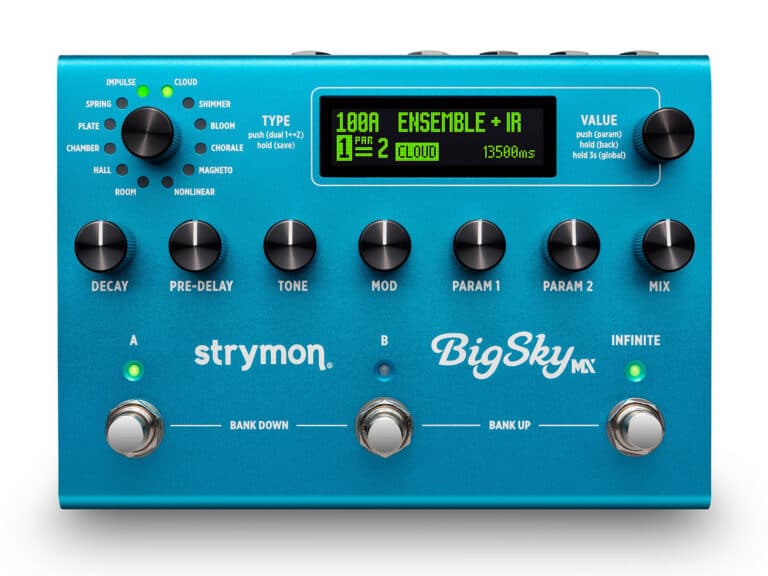
One of the grandest features of BigSky MX is its Dual Mode functionality—the ability to utilize up to two of any of its spectacular reverb types simultaneously, which can be configured independently per preset! The Dual Mode settings for the current preset are always shown at the bottom left of the Home screen, and easily accessed via the TYPE encoder.
Configuring Dual Mode Options
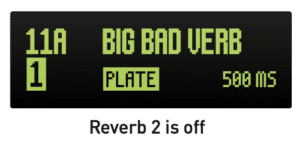
Reverb 2 Off – Sets Reverb 2 off so that the preset utilizes Reverb 1 only.
Parallel – Enables two reverbs and routes your input signal separately into each, so that neither reverb affects the other. Note that, when using stereo output, the output of each reverb can be panned left or right independently using the Pan parameter.
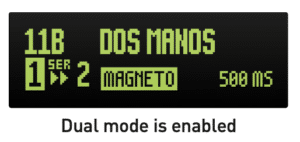
Series 1▶▶2 – Enables two reverbs and routes your input signal first into Reverb 1 and the Reverb 1 output into the input of Reverb 2.
Series 1◀◀2 – Enables two reverbs and routes the input signal first into Reverb 2 and the Reverb 2 output into the input of Reverb 1.
Split L|R – Enables two reverbs and routes the input signal separately into each (in parallel). Reverb 1 output is routed to the LEFT OUT only and Reverb 2 to the RIGHT OUT only.
Split R|L – Enables two reverbs and routes the input signal separately into each (in parallel). Reverb 1 output is routed to the RIGHT OUT only and Reverb 2 to the LEFT OUT only.
3. To Edit Reverb 1 or Reverb 2 – Push-release the TYPE encoder to select the desired reverb “1” or “2” to access its parameters for editing.
Once the desired Reverb 1, or 2 is selected, turn TYPE to chose its reverb type and edit any of the BigSky MX knobs or parameters to customize the preset.
4. Save (push and hold TYPE) to retain your settings with the preset.
The original BigSky had a reverb engine called REFLECTIONS which is not present on BigSkyMX. This is because the reverb type was designed to put you in virtual rooms we created for the original BigSky. The function of this reverb has been replaced by using IRs from real rooms and locations, and so it made much more sense to replace it with the IMPULSE reverb engine, allowing use of these IRs.
As with the original BigSky, most algorithms will process stereo signal by creating a copy of the stereo input signal, summing the copy to mono, then applying stereo widening and other stereo processes to the copied signal, which becomes the wet signal. The original stereo dry signal passes directly to the outputs, completely unaffected by any processing in the pedal.
Algorithms that are new to BigSky MX (The MX voiced Room, Hall, and Plate, as well as Chamber and Impulse) take the input signal, process it left and right, then output distinct left and right input signals alongside the stereo input signals, with no summing whatsoever.
No, we will continue to make BigSky and BigSkyMX side by side.
Configuring the EXP Jack
The BigSkyMX rear panel’s EXP jack can be set to work with an expression pedal, Strymon MultiSwitch/Multiswitch Plus device, or TRS MIDI for different types of external control. The first step is to choose the Global Settings menu’s EXP MODE settings for the device you’ll be connecting.

EXP MODE Options
Choose the option that provides the desired control functions for the controller device that you’ll be connecting to the EXP jack.
• Pedal – For use with an external expression pedal (TRS, 25k Ohm potentiometer minimum) for control of BigSky MX’s knobs.
• Bank – For use with an original Strymon MultiSwitch or a MultiSwitch Plus set to “TimeLine, BigSky, and Mobius mode”
The MultiSwitch device’s footswitches perform the following functions:
• Footswitch A (left footswitch) – Bank down
• Footswitch B (middle footswitch) – Toggles between the A and B presets of the current bank
• Footswitch C (right footswitch) – Bank up
Preset – For use with an original Strymon MultiSwitch or a MultiSwitch Plus set to “TimeLine, BigSky, and Mobius mode” The MultiSwitch device’s footswitches perform the following functions:
• Footswitch A (left footswitch) – Preset down
• Footswitch B (middle footswitch) – Bypasses/engages the currently loaded preset
• Footswitch C (right footswitch) – Preset up
• MIDI – For use with an external MIDI controller (TRS MIDI) for preset access and parameter control or preset changes. Alternatively, for use with a Strymon MultiSwitch Plus set to “Preset mode” to recall three specific presets. The MultiSwitch
Plus’s device’s footswitches perform the following
functions:
• Footswitch A (left footswitch) – Loads preset 0B
• Footswitch B (middle footswitch) – Loads preset 1A
• Footswitch C (right footswitch) – Loads preset 1B
NOTE: The EXP MODE jack setting persists across power cycles and is not saved per preset.
All of the inputs and outputs on our pedals use MONO TS unbalanced connections. You can use a TRS cable to plug into the inputs and outputs of the pedals, however, there is no benefit to using TRS balanced cable over a MONO TS instrument cable.
It is best to keep the IR management on BigSky MX at a maximum of 60 folders that contain a maximum of 50 IR files each. The BigSky MX firmware may not be able to handle too many IRs within a single folder, so it is recommended to stay within these limits.
BigSkyMX requires a power supply that provides 9VDC (center negative) at a minimum of 500mA.
For further information, please see our blog post on powering your effect pedals at the following link:
Gear Guide: Using the Right Power Supply for your Strymon Pedal
We always work hard to improve the experience our customers have with our products. The release notes below list the fixes and features we’ve added to BigSky MX. Download the Strymon Update software to update the firmware on your BigSky MX pedal.
BigSky MX Firmware REV v2.14 (Released June 2025)
What’s Fixed?
What’s New?
BigSky MX Firmware REV v2.02 (Released July 2024)
What’s Fixed?
What’s New?
Previous Releases
BigSky MX Firmware REV v1.98 (Released May 2024)
What’s Fixed?
To update the firmware on your BigSky MX to the latest version, download and install our Strymon Update software from the following page:
System Requirements
macOS 11.6.4 or higher
Windows 10 or higher
Once you have downloaded and installed Strymon Update:
Strymon Non-Transferrable Limited Warranty
Strymon warranties its products and their varying components to be free from defects in material and workmanship for the following periods of time from the original date of purchase when purchased from an Authorized Strymon Dealer:
If the product fails within the warranty period, Strymon will repair or, at our discretion, replace the product at no cost to the original purchaser.
This warranty covers defects in manufacturing discovered while using this product as recommended by Strymon. This warranty does not cover loss or theft, nor does the coverage extend to damage caused by misuse, abuse, unauthorized modification, improper storage, lightning, or natural disasters. Damage caused by any of the above circumstances may result in a non-warranty repair fee.
Products that were purchased from an unauthorized dealer are not covered under warranty. The warranty is non-transferrable and does not cover used or second-hand products.
Products purchased outside of your country (sales channel) have a warranty inside the country it was purchased ONLY and is not valid outside of the country it was purchased. Please contact your dealer for information on warranty and service outside of the USA and Canada.
In the case of malfunction, the purchaser’s sole recourse shall be repair or replacement, as described in the preceding paragraphs. Strymon will not be held liable to any party for damages that result from the failure of this product. Damages excluded include, but are not limited to, the following: lost profits, lost savings, damage to other equipment, and incidental or consequential damages arising from the use, or inability to use this product. In no event will Strymon be liable for more than the amount of the purchase price, not to exceed the current retail price of the product. Strymon disclaims any other warranties, express or implied. By using the product, the user accepts all terms herein.
For North American customers: Contact Strymon through our website at https://www.strymon.net/support for Return Authorization and information. Proof of original ownership may be required in the form of a purchase receipt.
For Customers Outside the USA and Canada: Contact the Strymon dealer from which the product was purchased from in order to arrange warranty repair service.
To locate your nearest authorized Strymon dealer, please use the following link:
You can also contact Strymon directly at (805) 468-8788 or (800) 980-8160 for help finding your nearest authorized Strymon dealer.
Strymon products purchased from an authorized dealer are covered by a manufacturer’s warranty. A purchase receipt from an authorized dealer is required with any request for warranty service.
Please note that any Strymon products that have been purchased from an unauthorized dealer are not eligible for coverage under the manufacturer’s warranty. If you are uncertain, please contact Strymon directly at (805) 468-8788 or (800) 980-8160 before your purchase.
***NOTE: Warranties for Strymon products are non-transferrable. Second-hand items, including sales from websites such as craigslist, Ebay, and Reverb are not covered by a manufacturer’s warranty. ***
Your warranty is valid in the region of purchase. For example, if you buy your product in Japan, any service-related issues will need to be handled in Japan. Products purchased in the United States can only be repaired in the United States.