
The Sound of Strymon: Sound Designer Pete Celi
Strymon co-founder Pete Celi is responsible for the sound design and DSP algorithm creation for all the Strymon pedals that use DSP. Recently I had the
Financing Available Through ![]()

One of the insanely great things about being part of the small Strymon team is writing and recording a lot of the music that appears in our videos and sound clips. Many of you know that I record a lot of songs as State Shirt—but a large part of my musical output stays right here, as ingredients in the presentation of our pedals. Recently I had a ton of fun in the studio recording a song for our new DIG Dual Digital Delay. The only effect used on the guitars and synths in this song (other than a tube preamp) is DIG.
I thought it would be interesting to deconstruct the song so you can hear some of the individual guitar and synth parts, and check out the DIG Delay settings used.
Here’s the DIG video that features this song:
Now let’s pull out some of the guitar and synth parts so you can hear them separately.
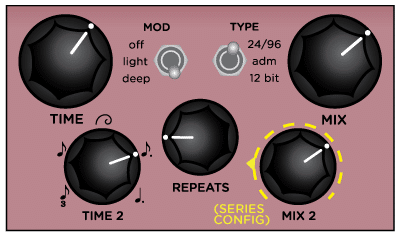
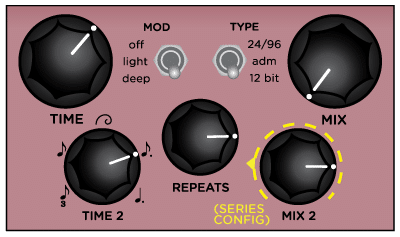
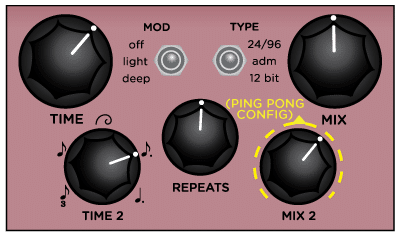
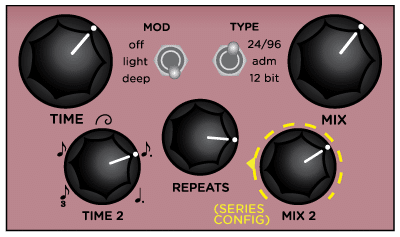
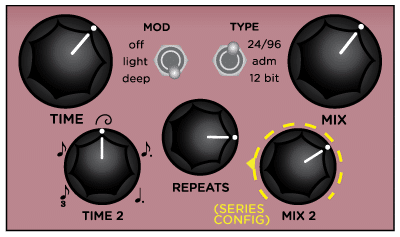
The first guitar you hear on the track is a slightly palm-muted staccato element. For this part I used the 24/96 delay type set to a Dotted Eighth note subdivision, with the delays in Series configuration. The delay config is a secondary function under the Mix 2 knob. Press and hold both footswitches while turning the knob—turn left for Series, center for Ping Pong, and right for Parallel.
Here is one simple chord that plays right before the main beat kicks in. The 12-bit delay type, along with deep modulation, creates a washy sound. Here I’m only using Delay 2, which is set to a Dotted Eighth subdivision.
This synth melody brings us into the verse. Here the 12-bit delay with deep modulation softens the sharp nature of the synth patch. The Golden Ratio subdivision creates delay repeats that don’t directly line up with the tempo of the melody. Repeats are set short to keep this part in the foreground.
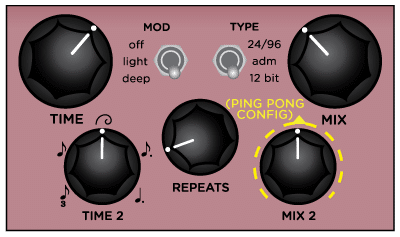
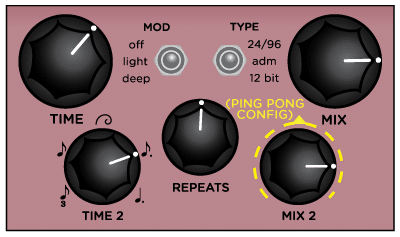
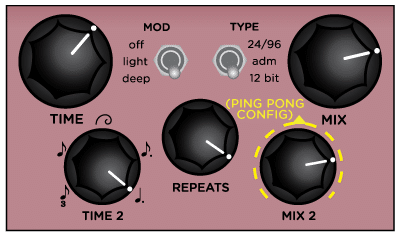
This simple riff comes in during the first verse. The ADM delay type provides the slightly grungy sound heard in the repeats here. The Ping Pong configuration widens out the sound.
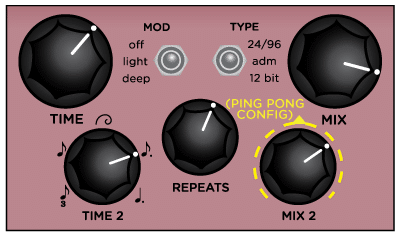
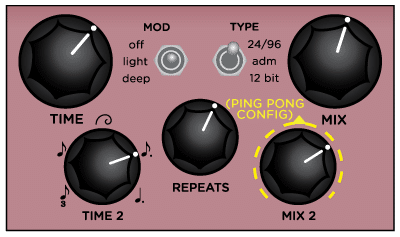
This dotted eighth guitar line (reminiscent of something The Edge might play) features the ADM delay type, Ping Pong configuration, and light modulation to allow the sound to move around a bit.
This simple, driving rhythm sets the foundation for the bridge of the song. Here I’m using the ADM delay type for sharp, percussive repeats, and light modulation to give the delay some movement.
This synth melody comes in during the bridge. The 24/96 delay allows for crystal clear repeats of the input signal. Mild modulation and Ping Pong configuration add some space and widen the synth sound.
This overdriven lead tone doubles the synth tone above. It utilizes the 24/96 delay type for clear reproduction of the guitar signal. I’ve dialed the Repeats Filter to about 2:00, which removes a bit of the low end from the delay. Deep modulation give the delays a large presence. The overdrive comes courtesy of a Damage Control tube preamp.
The Golden Ratio subdivision along with a very high Repeats setting give this delay a distinctly reverb-like quality. The Repeats Filter is set to 2:00 to eliminate some low end from the repeated signal. A Damage Control tube preamp provides the overdrive.
Here a simple chord is transformed into an ethereal outro using the Golden Ratio subdivision and a very high Repeats setting. The 12-bit delay type and deep modulation provide a darker experience, and setting the Repeats Filter to 9:00 removes even more high end for a very warm and smooth sound.
Well, I hope you enjoyed this little inside look at the recording of the DIG Delay video song and the creation of some of the sounds used within. Have your own DIG settings that you’d like to share? Post them below or share them online with the hashtag #strymondig.
Stay tuned: In the coming weeks we’ll be offering up the individual stems of the song so that you can use them to make your own remixes.
Happy delay-ing.
– Ethan

Strymon co-founder Pete Celi is responsible for the sound design and DSP algorithm creation for all the Strymon pedals that use DSP. Recently I had the

Rack-mount digital delays of the ’80s ushered in a new era of audio effects. They generated the cleanest delays yet to be heard, but also
It was 2005, and I was in eighth grade. I had just picked up the guitar and was taking lessons, so my friend Richard thought I’d
10 Responses
What guitar/amp did you use in this video?
Hi, We used a Damage Control tube preamp and a Kauer Arcturus guitar. 🙂
Good stuff and yes I love that rare Kauer he maybe made 3 with that relic style and color so cool.. Keep these coming I love hearing and seeing preset ideas. Favorite
Thanks for the breakdown !! Great sounds, keep um’ coming 🙂
Hi Guys … how do you record your guitar tracks? They always sound fantastic and the DIG is excellent as well!
Keep up the great work.
Just found this! Very cool song, and an excellent set of examples to show off the DIG. Do you feel like you could only get these sounds out of the DIG vs the Timeline?
@Tyler – You can get similar, but not the same sounds with TimeLine. The dual delay on the TimeLine has the voicing of the 24/96 setting on DIG, but does not offer the ADM or 12-bit voicings of the DIG. The TimeLine also does not have the Golden Ratio tap division for these voicings.
Just got my DIG a few days ago. Love it! This thing is like a swiss army knife. What I like doing is set delay 2 in free mode and minimum time. High mix 2, deep mod and ADM type. That makes an awesome chorus/flange sound. Use delay 1 as a normal delay. With a nice amount of gain, this makes a lead tone that is KILLER!!
Is it just my impression or is the mod really different on every delay type?
@Tonirazz – Thanks for the feedback and glad you are enjoying your DIG! The Mod is actually the same on the 3 delay types.
And slightly off-topic…
that internal jumper for the stereo input was not your best idea. Every time I want to use it with keyboards, I need to unscrew the bottom.