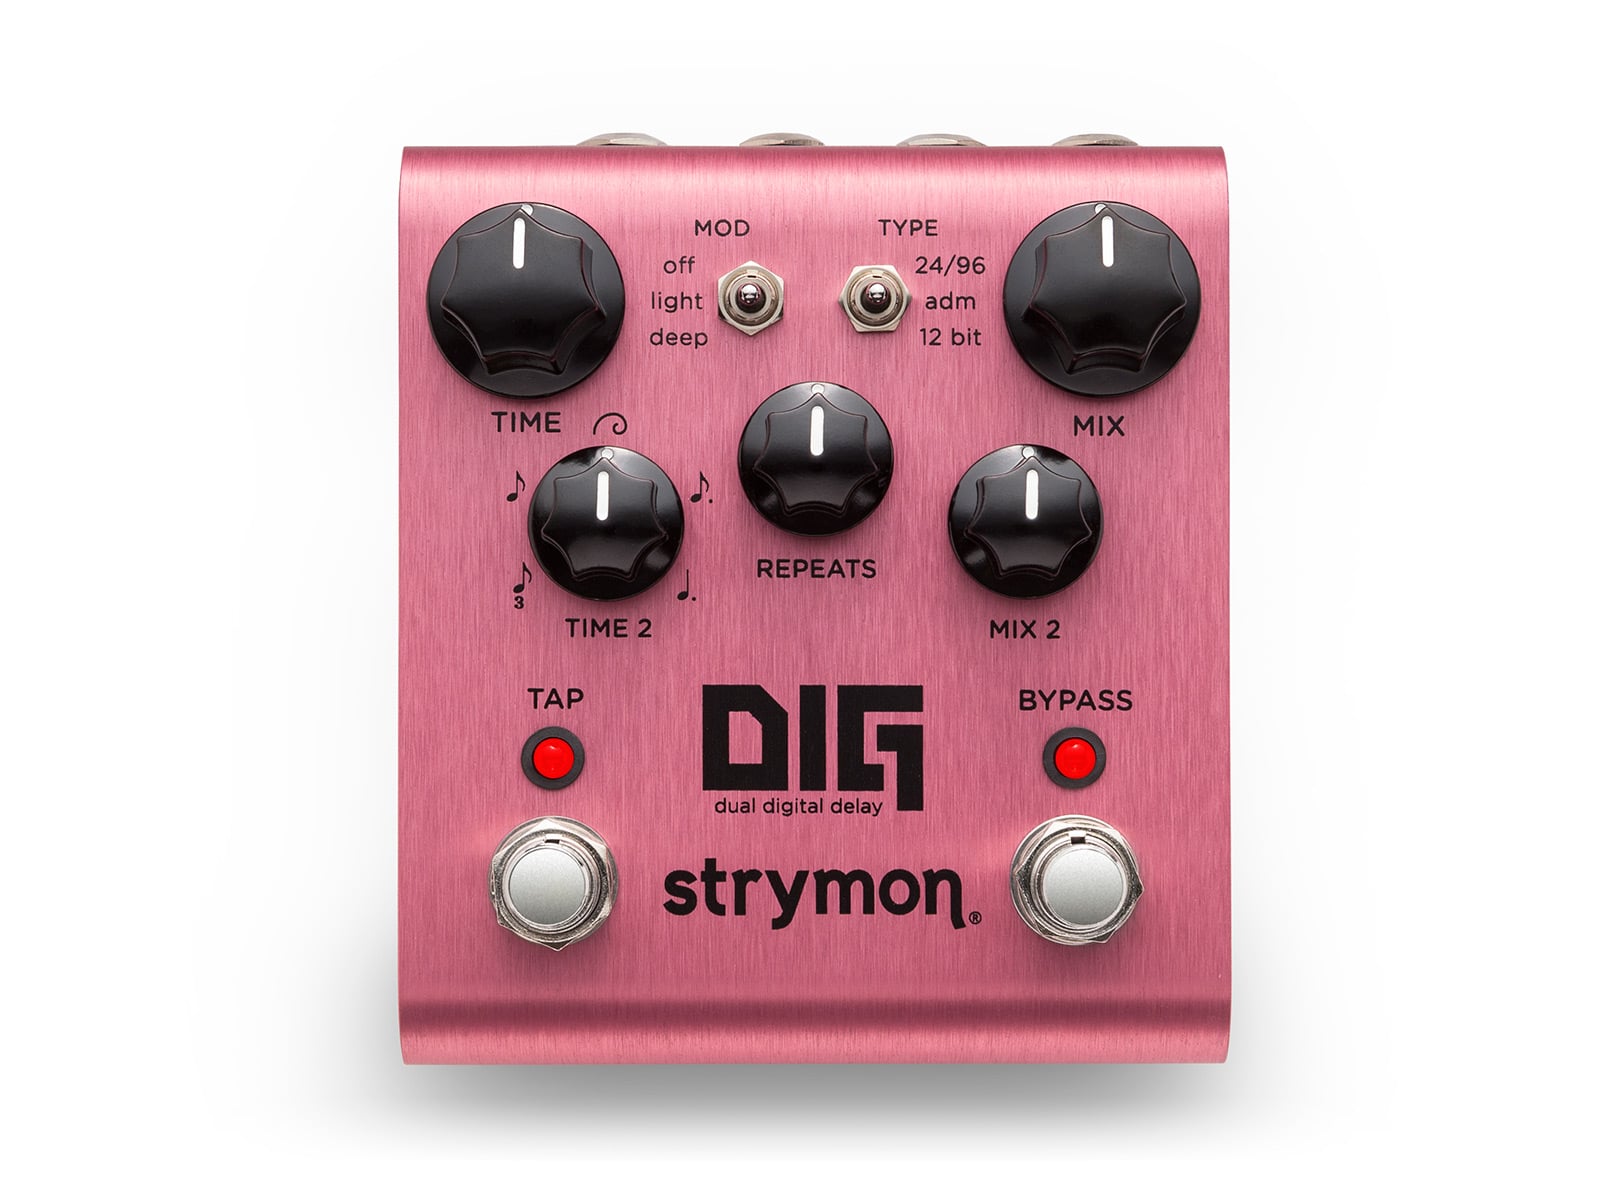
Holding down the TAP footswitch enables Circular Repeats, where both delay lines maintain a static volume and repeat continuously until the TAP footswitch is disengaged. At this point, all previous settings will be restored.
Free ground shipping on domestic orders over $49. Dismiss
Skip to contentDownload the user manual, read FAQs or contact us if you need more help.
NOTE: This support page is for a discontinued product. If you have a V2 DIG (6 knob) click here for support information.
Holding down the TAP footswitch enables Circular Repeats, where both delay lines maintain a static volume and repeat continuously until the TAP footswitch is disengaged. At this point, all previous settings will be restored.
DIG will work with an external Tap switch that utilizes a TRS stereo cable connection. Check out our TAP Favorite switch.
Each of our Strymon digital effect pedals (excludes OB.1) have the ability to be used with mono or stereo connections. Here are 3 different connection setups you can use with these pedals.
Mono Input => Mono Output
For Compadre, Riverside, and Sunset: Connect a standard mono TS instrument cable into the INPUT and connect a mono TS instrument cable to the OUTPUT of the pedal.
For blueSky and Ola: Connect a mono TS instrument cable into the LEFT INPUT and LEFT OUTPUT for a mono connection.
For BigSky, Mobius, NightSky, TimeLine, and Volante: Connect a mono TS instrument cable into the LEFT INPUT and LEFT OUTPUT for a mono connection. On the TimeLine and Mobius ONLY, make sure that the switch on the back of the pedal is set to STEREO IN/OUT.
For all other Strymon two footswitch Strymon pedals (including Iridium, Zelzah, and V2 pedals with mono/ stereo switch), connect a standard mono TS instrument cable into the INPUT and connect a mono TS instrument cable to the LEFT OUTPUT of the pedal.
Mono Input => Stereo Output
For Mono INPUT and Stereo OUTPUT on our small 2 footswitch pedals: Connect a standard mono TS instrument cable into the INPUT and connect a mono TS instrument cable to both the LEFT and RIGHT OUTPUTS of the pedal. (excludes Compadre, Riverside, and Sunset)
For blueSky and Ola: Connect a mono TS instrument cable into the LEFT INPUT and a mono TS instrument cable to both the LEFT and RIGHT OUTPUTS for stereo output.
For BigSky, Mobius, NightSky, TimeLine, and Volante: Connect a mono TS instrument cable into the LEFT INPUT and both LEFT and RIGHT OUTPUTS for stereo output. On the TimeLine and Mobius ONLY, make sure that the switch on the back of the pedal is set to STEREO IN/OUT.
Stereo Input => Stereo Output
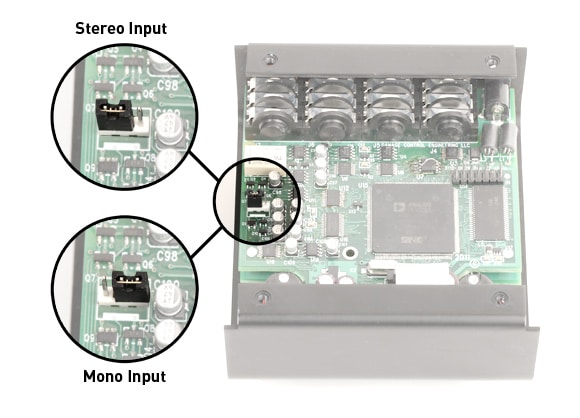
For Stereo input and Stereo output on our small 2 footswitch pedals (except V2 pedals, Iridium, Zelzah, blueSky and Ola), you must first open up the pedal to move the internal jumper over the LEFT 2 pins to set the pedal for TRS Stereo input.
Once the pedal is set for TRS Stereo input, make sure to use a TRS Stereo cable into the INPUT and connect a mono TS instrument cable to both the LEFT and RIGHT OUTPUTS of the pedal.
For blueSky and Ola: Connect a mono TS instrument cable into the LEFT and RIGHT INPUTS along with both LEFT and RIGHT OUTPUTS for stereo input and output. The internal jumper on these pedals does not need to be adjusted to work in stereo and should be left in its default position (connecting the left 2 pins when viewed from below).
For BigSky, Mobius, NightSky, TimeLine, and Volante: Connect a mono TS instrument cable into the LEFT and RIGHT INPUTS along with both LEFT and RIGHT OUTPUTS for stereo input and output. On the TimeLine and Mobius ONLY, make sure that the switch on the back of the pedal is set to STEREO IN/OUT.
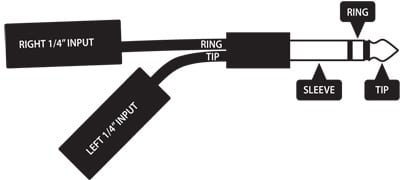
For V2 pedals, Iridium, and Zelzah: Using a TRS -> dual TS cable, connect the TRS stereo cable into the input of the pedal, and a mono TS instrument cable to both LEFT and RIGHT OUTPUTS of the pedal. You will need to flip the switch on the back panel of the pedal from MONO to STEREO to enable stereo input.
Yes. Once you adjust the secondary function settings on your Strymon pedal they will not change after powering down your pedal until you manually change them again.
Set Pedal to Expression Pedal Mode
1. Set the toggle switches on your pedal to the UP position
2. While holding down both foot switches, power on the pedal while continuing to hold down the foot switches for about 2-3 seconds. This will put you in expression pedal mode.
Assign a Parameter to Expression Pedal
Once you have your pedal set to expression pedal mode you still need to assign the parameter you’d like to your expression pedal.
1. Power on the Strymon pedal while holding down the left foot switch
2. While continuing to hold down the foot switch, turn whichever knob you want to assign to the expression pedal. The first knob you turn will be the knob assigned.
The secondary function for the MIX 2 knob sets the Dual Delay configuration. Press and hold both TAP and BYPASS footswitches while turning the MIX 2 knob to adjust. Turn left for Series, center for Ping Pong, or right for Parallel configuration.
Series
In Series configuration, Delay 2 feeds Delay 1. This is equivalent to putting two single delay pedals in succession on your pedal board. A mono input feeds both left and right channels.
Ping Pong
In Ping Pong Mode, the delays are configured in a series ‘ping-pong’ configuration. When using a mono output signal, this configuration is the same as the Series configuration. In stereo, each delay acts as a ping-pong delay, and they interact when both Mix knobs are turned up.
Parallel
In Parallel configuration, the delays do not interact with each other, but produce their outputs ‘side-by-side’. In Stereo, Delay 1 outputs to the left channel, and Delay 2 outputs to the right channel. When the right output is not used, the wet signal sums to mono so that both parallel delays are heard from the left output.
DIG features two true-stereo delays that allow for many creative, rhythmic and ambient delay effects. Delay 2 is a synchronous subdivision of Delay 1 by default out of the box and can be set to run ‘free’ if desired. They can be combined in three different configurations:
DIG can be set up to mute the dry signal, useful for Parallel effects loops.
Press and hold both of the footswitches while plugging in the power to the pedal. While holding the switches down, turn the TIME knob to the RIGHT position to kill the dry signal. This will mute the dry signal, allowing the MIX and MIX 2 controls to be used as effect levels.
To turn off Kill Dry, press and hold both of the footswitches while plugging in the power to the pedal. While holding the switches down, turn the TIME knob to the LEFT position.
You can set the input for DIG for either mono input or TRS stereo input. The pedal ships in mono configuration from the factory. Here’s how to adjust this configuration.
Remove the back cover of your pedal.
On the left side of the circuit board, you’ll see a jumper that can be set in two positions. Place the jumper on the left 2 pins for TRS stereo input. Place the jumper on the right 2 pins for mono input (factory setting).
In order to use the TRS stereo input, you’ll need a TRS stereo input adapter like the one shown below. You can purchase one here.
DIG has unique digital voicings for 24/96, ADM, and 12 bit delays with the ability to set the output configuration to ping pong between the left and right outputs when used in stereo. It also has the Golden Ratio tap division which is not available on the TimeLine and provides delays that will never step on the repeats for getting a great ambient sound with long trails.
On TimeLine there are more options for the different ratios of the second delay, modulation, and filter controls for the Dual delay machine.
We have tested the Moog EP-2/EP-3, and Mission Engineering EP-25K, and they will all work with our pedals to varying degrees. (There may be others but we haven’t tested them yet.)
We recommend using expression pedals that have a minimum 25k ohm or higher potentiometer such as as the Moog EP-3 or Mission Engineering EP-25k.
To set the EXP input to TAP switch mode:
To set the EXP input to Favorite switch mode:
Unplug the power to your pedal. Plug in the power while holding down BYPASS. When the pedal powers on, let go of BYPASS. Repeat this process to go back into non-Trails mode.
All Strymon pedals sold within North America (except OB.1) include a 9VDC 660mA power supply. OB.1 includes a 9V battery.
We recommend a power supply that provides 9VDC (center negative) at a minimum of 250mA.
Do not subject your Strymon pedal to any voltage above 9V. Doing so will damage your pedal and void your warranty.
For further information, please see our blog post on powering your effect pedals at the following link:
Gear Guide: Using the Right Power Supply for your Strymon Pedal
You can, but please take these precautions:
First, make sure the dip switches on the bottom of your Pedal Power are set to the NORMAL (9V) position. Do not subject your Strymon pedal to any voltage above 9V as doing so will damage your pedal and void your warranty.
Brigadier, blueSky, Deco, DIG, El Capistan, Flint, Lex, Ola, and Orbit all require a minimum of 250mA of current. You will need to use output 5 or 6 on your Pedal Power 2+ with the standard black power cables.
OB.1 only requires 20mA, so you can use outlets 1 through 4. Make sure to use the Pedal Power 2+, the original Pedal Power 2 does not provide enough current (mA).
A better solution would be to use our Strymon Ojai and Zuma high current power supplies which provide multiple high current 9V DC outputs which can each power any of our pedals.
We don’t recommend using daisy chain power supplies. Ground loops are commonly caused when using a daisy chain power cable to power multiple pedals. This creates a ground loop between every pedal in the daisy chain. Ground loops allow stray magnetic fields to introduce hum into your signal path.
If the only type of effect you use is distortion you may not have (or hear) the ill effects. But, if you have modulation and delay pedals the likelihood of ground loops wreaking havoc on your signal is high.
If you don’t plan on using the included power adapter, we recommend an isolated power supply. An isolated supply works by using a transformer (or multiple transformers) to keep every power outlet completely electrically isolated. We offer two fully-isolated, high current DC power supplies, Ojai and Zuma. Click below for more info:
The default Delay 1 time range on DIG is 20ms to 1.6 seconds.
The range can change depending on what setting you’re using for the Delay 1 Subdivision secondary function:
Also, when using Free Mode, the delay time range for Delay 2 is 20ms to 1.6 seconds.
DIG, El Capistan, and Brigadier pedals all provide delay effects, each with their own tonal characteristics and feature sets.
DIG features two simultaneous digital delays with different voicings from the 1980s and today that can be set to series, parallel, and ping pong configurations.
Brigadier is an authentic recreation of analog bucket-brigade style delays with a selectable dBucket ‘chip’ to choose from short, medium, and long delays of 40ms – 5 seconds.
El Capistan is an in-depth recreation of tape echo machines with variable tape head modes, a 20 second sound-on-sound looper, and an adjustable spring reverb.
Three very different styles of delay. Your choice really all depends on the sound you’re going for. Check out the sound samples on the DIG, El Capistan, and Brigadier product pages.
All of the inputs and outputs on our pedals use MONO TS unbalanced connections. You can use a TRS cable to plug into the inputs and outputs of the pedals, however, there is no benefit to using TRS balanced cable over a MONO TS instrument cable.
The TYPE switch on the DIG selects between 3 different A/D and D/A conversion modes used in the digital delay. Each conversion mode provides the delay effect with a different sonic characteristic:
Yes, they feature high-impedance inputs and accept up to +8dBu, instrument or line level.
Strymon Non-Transferrable Limited Warranty
Strymon warranties its products and their varying components to be free from defects in material and workmanship for the following periods of time from the original date of purchase when purchased from an Authorized Strymon Dealer:
If the product fails within the warranty period, Strymon will repair or, at our discretion, replace the product at no cost to the original purchaser.
This warranty covers defects in manufacturing discovered while using this product as recommended by Strymon. This warranty does not cover loss or theft, nor does the coverage extend to damage caused by misuse, abuse, unauthorized modification, improper storage, lightning, or natural disasters. Damage caused by any of the above circumstances may result in a non-warranty repair fee.
Products that were purchased from an unauthorized dealer are not covered under warranty. The warranty is non-transferrable and does not cover used or second-hand products.
Products purchased outside of your country (sales channel) have a warranty inside the country it was purchased ONLY and is not valid outside of the country it was purchased. Please contact your dealer for information on warranty and service outside of the USA and Canada.
In the case of malfunction, the purchaser’s sole recourse shall be repair or replacement, as described in the preceding paragraphs. Strymon will not be held liable to any party for damages that result from the failure of this product. Damages excluded include, but are not limited to, the following: lost profits, lost savings, damage to other equipment, and incidental or consequential damages arising from the use, or inability to use this product. In no event will Strymon be liable for more than the amount of the purchase price, not to exceed the current retail price of the product. Strymon disclaims any other warranties, express or implied. By using the product, the user accepts all terms herein.
For North American customers: Contact Strymon through our website at https://www.strymon.net/support for Return Authorization and information. Proof of original ownership may be required in the form of a purchase receipt.
For Customers Outside the USA and Canada: Contact the Strymon dealer from which the product was purchased from in order to arrange warranty repair service.
To locate your nearest authorized Strymon dealer, please use the following link:
You can also contact Strymon directly at (805) 468-8788 or (800) 980-8160 for help finding your nearest authorized Strymon dealer.
Strymon products purchased from an authorized dealer are covered by a manufacturer’s warranty. A purchase receipt from an authorized dealer is required with any request for warranty service.
Please note that any Strymon products that have been purchased from an unauthorized dealer are not eligible for coverage under the manufacturer’s warranty. If you are uncertain, please contact Strymon directly at (805) 468-8788 or (800) 980-8160 before your purchase.
***NOTE: Warranties for Strymon products are non-transferrable. Second-hand items, including sales from websites such as craigslist, Ebay, and Reverb are not covered by a manufacturer’s warranty. ***
Your warranty is valid in the region of purchase. For example, if you buy your product in Japan, any service-related issues will need to be handled in Japan. Products purchased in the United States can only be repaired in the United States.