Download the user manual, read FAQs, or contact us if you need more help.
NightSky is a stereo reverb with a wide range of hand-on control for experimental sound design. Features include real-time continuous control of reverb pitch/processing rate/core size, harmonics, and a synth-like resonant filter with multiple modulation waveshapes. There is also an 8 step reverb pitch sequencer with variable portamento.
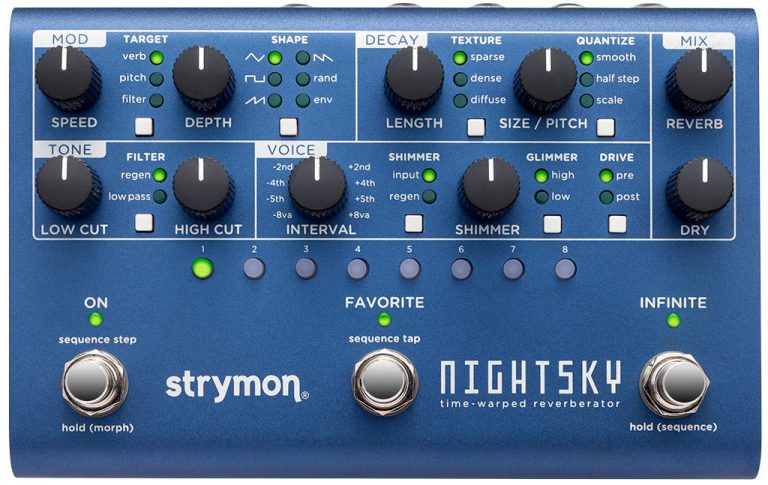
From the top panel, there are several different sections in the NightSky user interface to provide a wide range of control over the reverb signal. Here is a diagram of the signal flow routing within NightSky to show how the audio is processed by each section:
The MOD section varies a selectable target parameter in the shape of the selected waveform.
TARGET – Selects the process that the modulation is applied to. Press the button to select one of three options.
verb: Modulates the delay lines within the regenerating reverb core.
pitch: Modulates the size (process rate) of the reverb core.
filter: Modulates the HIGH CUT tone control position.
SHAPE – Selects the modulating waveform shape. Press the button to select one of six options.
triangle: Wave rises and falls evenly. When TARGET is set to filter, it becomes a sine wave with smooth, continuous ‘S’-shaped oscillation.
square: Wave jumps between two fixed values.
ramp: Wave rises gradually and falls abruptly.
saw: Wave falls gradually and rises abruptly.
random: Wave jumps between random values.
env: Modulation value responds to your input dynamics with the sensitivity set by the DEPTH knob, and returns at a rate set by the SPEED knob. The envelope is negative on left half of the DEPTH knob and positive on right half, with maximum sensitivity at the extremes. The middle position of the DEPTH knob is OFF when env is selected.
SPEED – Adjusts the rate of modulation from 0.06Hz (16 second sweep) to 12Hz (0.08 second sweep).
DEPTH – Adjusts the amount of modulation. Modulation is off at the fully counter-clockwise position.
Selects the reverb architecture and sets the tail characteristics.
TEXTURE – Selects one of three different reverb types.
sparse: Granular-sounding reverb that can create interesting effects with staccato inputs, or produce a clean reverb with sustained inputs.
dense: Plate-like reverb with a fast response and dense reflections that can venture into ambient territory at high decay times.
diffuse: Slow-building, atmospheric wash that excels at ambient, swell, and even reverse-like textures.
QUANTIZE – Selects the response and range of the SIZE/PITCH knob. Press the button to select one of three options.
smooth: SIZE/PITCH varies smoothly and continuously over a 2.5 octave pitch range.
half step: SIZE/PITCH is quantized into half-step intervals over a two octave range.
scale: SIZE/PITCH is quantized into selectable scales over a two octave range.
NOTE: For both half-step and scale
Noon = middle of range.
Minimum = one octave up.
Maximum = one octave down.
Scale Select (Live Edit function) – Select one of eight scales that determine the quantization intervals of the SIZE/PITCH knob when QUANTIZE is set to scale mode.
LENGTH – Adjusts the reverb decay time from less than one second to nearly infinite sustain. At long decay settings, decay time may be impacted by the TONE settings.
SIZE/PITCH – Increases the size of the reverb core to create a larger “space” for reflections as the knob is turned clockwise which also allows for pitch variations during adjustment. The pitch range is 2.5 octaves with QUANTIZE set to smooth and two octaves with QUANTIZE set to half step or scale.
Pre-Delay (Live Edit function) – Adjusts the time between the dry signal and the onset of the reverb.
Applies filtering equalization to the high and low frequency portions of the reverb.
FILTER – Selects the response of the HIGH CUT knob. Press the button to select one of two options.
regen: Removes high frequencies from the regenerating core, creating a reverb that gets darker as it decays.
low pass: Applies a synth-style peaking, high frequency roll-off to the reverb output, selectively shaping the frequency content. The low pass filter’s resonance amount can be controlled via the Low Pass Q Live Edit function.
LOW CUT – Removes low end content both at the output and in the regenerating core portion of the reverb as the knob is turned clockwise.
HIGH CUT – Removes high frequency content from the reverb as the knob is turned clockwise, with characteristics determined by the FILTER switch selection.
Low Pass Q (Live Edit function) – Adjusts the filter Q, or resonance.
Adds pitch, harmonics, and distortion effects to the reverberated signal.
SHIMMER (button) – Selects the type of pitch-shifted shimmer effect. Press the button to select one of two options.
input: Shimmer effect is applied to the input of the reverb core and does not regenerate.
regen: Shimmer effect is applied within the reverb core and the effect is regenerative, resulting in continuously ascending or descending pitches as the reverb decays. NOTE: Smaller SIZE/PITCH settings and higher DECAY settings will result in more intense pitch regeneration.
INTERVAL – Selects the pitch interval of the shimmer effect from the options around the knob. 2 octaves of total range from -1 octave to +1 octave.
SHIMMER (knob) – Sets the amount of the shimmer effect applied to the reverb signal. Shimmer effect is off when set to minimum.
GLIMMER – Dynamically enhances aspects of the input signal’s harmonic spectrum. Press the button to select one of three options.
high: Higher frequency harmonics are accentuated creating a washy, dreamy top end.
low: Lower frequency harmonics are enhanced creating mysterious and synth-like textures.
LED off: GLIMMER is disabled.
Glimmer Gain (Live Edit function) – Adjusts the sensitivity of the Glimmer block to the input signal.
DRIVE – Adds saturated overdriven harmonics with a soft clipping characteristic to the reverb. Press the button to select one of three options.
pre: Applies DRIVE to the signal before the reverb core.
post: Applies DRIVE after the reverb core, allowing the reverb tail to dynamically go into and out of saturation as the reverb decays.
LED off: DRIVE is disabled.
Drive Gain (Live Edit function) – Adjusts the sensitivity of the DRIVE block to the input signal.
Adjust the level of the dry and reverb signals at the outputs.
REVERB – Sets the output level of the reverberated signal.
DRY – Sets the output level of the unprocessed signal. Set to 12 o’clock position for unity gain.
There are 16 on-board presets that are accessible by using the 8 PRESET BUTTONS on NightSky. They are arranged in 2 banks of 8 presets with different PRESET BUTTON colors indicating the selected bank.
The currently selected preset becomes your active Favorite preset. Your Favorite preset can be instantly recalled by pressing the FAVORITE footswitch while in reverb mode.
To select a new Favorite preset:
To SAVE a new Favorite setting to any of the 16 on-board slots:
If you are controlling NightSky via MIDI, you have access to 300 presets available via MIDI Program Change through either the 5-pin DIN MIDI IN port, the USB-mini port, or through the EXP jack set to PRESET mode. This power-up mode for the EXP jack will accept MIDI Program Change messages to recall presets on NightSky on the MIDI Channel that the pedal is set to.
How to Set the EXP Jack to Accept 1/4″ MIDI
How to Set the MIDI Channel
Additional MIDI Control Information
NightSky contains 300 preset locations, numbered sequentially from 0-299. Because MIDI Program Change messages have a maximum number of 128 (0-127) the presets are grouped into three MIDI patch banks.
NightSky always powers up in MIDI Patch Bank 0, so if you plan to stay within the first 127 presets, simply send a standard MIDI Program Change message to load a preset.
If you will be using MIDI Banks 1 and/or 2, it is advisable to send a standard MIDI Bank Change message (MIDI CC# 0 with a value equal to the MIDI Bank#) before each MIDI Program Change message.
Sending MIDI CC# 0 with a value 0, MIDI Program Change #’s 0-15 will correspond to the 16 on-board Favorite presets accessible via the FAVORITE footswitch and the PRESET BUTTONS. Also, when in bank 0, MIDI PROGRAM CHANGE # 127 will put NightSky into Manual mode. In this mode, the pedal will be set to the current knob and button, settings. No preset data can be stored at this preset location.
NightSky provides a way to adjust several settings that do not have a dedicated knob or button. Live Edit Functions are saved per preset.
PRE-DELAY
GLIMMER GAIN
DRIVE GAIN
LOW PASS RESONANCE
SCALE SELECT
SEQUENCE GLIDE
Respond to MIDI CLOCK
MIDI EXPRESSION
INFINITE INPUT
There are several Power Up Functions on NightSky that control various global parameters. All Power Up Function settings will persist through power cycles.
While in this state, the buttons and knobs correspond to the different Power Up Functions:
The Morph function allows NightSky to sweep between the current sound of the pedal and a set of alternate knob settings and back.
Setting Up Morph Parameters
NOTE: Morph parameter settings are saved independently per preset.
You can set the EXP jack on NightSky to accept an expression pedal for real-time control over any one or more of the knobs in any direction.
To set the EXP jack to Expression mode:
NOTE: EXP jack assignment persists through power cycles.
To assign knobs to be controlled with the expression pedal:
Make sure to save your presets after assigning the expression pedal to save the assignment to your presets. We recommend using an expression pedal with a 25k Ohm minimum potentiometer.
NOTE: Expression pedal assignment is saved independently per Favorite/MIDI preset.
There are several modes to use with MultiSwitch Plus for expanded control over NightSky. First you must set the EXP jack NightSky for the desired operation.
To configure NightSky for use with MultiSwitch Plus:
Then, set MultiSwitch Plus for the correct mode of operation:
NOTE: If NightSky is in Sequence mode, loading a new preset will stop the sequence and cause the pedal to switch to Reverb mode.
NOTE: In MOD/TONE/VOICE Bypass Mode, the LEDs for each section will turn off when it is bypassed. These bypass settings can be saved to a preset, however, the LEDs for all sections will be lit when you recall the preset regardless of the bypass state.
NightSky has a built-in eight step sequencer where each step can have an independent SIZE/PITCH parameter setting for creating rhythmical pitch patterns with the currently loaded reverb settings. The sequence can be stepped through manually with the ON (sequence step) footswitch, or it can run continuously at the tempo set by using the FAVORITE (sequence tap) footswitch. Sequences are saved per preset.
To enter Sequence mode, press and hold the INFINITE (sequence) footswitch until the ON LED turns RED.
The PRESET BUTTONS now become sequence steps 1 through 8 with an AMBER button indicating that the step is active. A dark PRESET BUTTON indicates that the step is not active.
NOTE: An unlit PRESET BUTTON will be skipped over and does not indicate a rest.
Tap a tempo using the FAVORITE (sequence tap) footswitch to run the sequencer at the rate of the tapped tempo. A PRESET BUTTON LED will illuminate RED to indicate the current step.
Sequence Glide can be adjusted to add portamento to smooth the changes between the sequence steps.
MIDI Connections to NightSky
To begin using NightSky with an external MIDI device, connect the MIDI OUT from another pedal, controller, or computer interface to the MIDI IN or EXP jack on NightSky set to MIDI mode. The following devices can be used to send MIDI messages to NightSky:
Set EXP jack to MIDI Mode
Once you have connected NightSky to a MIDI source, you must set the EXP jack to MIDI mode.
Set MIDI Channel
Next, you will need to select a MIDI channel to communicate with NightSky. NightSky is set to MIDI channel 1 by default.
Set MIDI Output Mode for the EXP Jack
The MIDI Output mode must be set to determine what kind of MIDI data is sent out by NightSky. ***NOTE: If you are only sending MIDI data to NightSky or if you are using the Strymon MIDI EXP cable, the MIDI Output mode must be set to OFF.***
Saving Presets via MIDI
When using MIDI, the currently loaded settings on the pedal can be saved to any of NightSky’s 300 preset locations at any time.
Recalling Presets
NightSky contains 300 preset locations, numbered sequentially from 0-299. Because MIDI Program Change messages have a maximum number of 128 (0-127) the presets are grouped into three MIDI patch banks:
NightSky always powers up in MIDI Patch Bank 0, so if you plan to stay within the first 127 presets, simply send a standard MIDI Program Change message to load a preset.
If you will be using MIDI Banks 1 and/or 2, it is advisable to send a standard MIDI Bank Change message (MIDI CC# 0 with a value equal to the MIDI Bank#) before each MIDI Program Change.
Selecting bank 0, patch 127 will put NightSky into Manual mode. In this mode, the pedal will be set to the current knob and switch settings. No preset data can be stored at this preset location.
On NightSky, you can synchronize the sequencer’s playback tempo to MIDI clock that is received from any of the MIDI inputs:
To set NightSky to respond to MIDI clock:
If NightSky is in Sequence mode and is responding to MIDI Clock, the sequence will run as soon as you tap the FAVORITE footswitch.
Dry Signal: Analog Dry Path
Input Impedance: 1M Ohm
Output Impedance: 100 Ohm
Input: 1/4″ TS (unbalanced)
Outputs: 1/4″ TS (unbalanced)
A/D & D/A: 24-bit 96kHz
Max Input Level: +8dBu
Frequency Response: 20Hz to 20kHz
Signal to Noise: 115dB typical
DSP Performance: 1585 MegaFLOPS
Bypass Switching: True Bypass (electromechanical relay switching); optional Buffered Bypass or when using Stereo output
Dimensions: 4.5” deep x 7” wide x 2.5” tall (11.4 cm deep x 17.8 cm wide x 6.0 cm tall)
Power requirements: 9VDC center negative; 300mA minimum
A factory reset will reset all custom presets, power up functions, and secondary parameters back to factory settings.
We recommend a power supply that provides 9VDC (center negative) with a minimum 300mA of current.
Do not subject your Strymon pedal to any voltage above 9V. Doing so will damage your pedal and void your warranty.
All Strymon pedals sold within North America (except OB.1) include a 9VDC 660mA power supply. OB.1 includes a 9V battery.
We don’t recommend using daisy chain power supplies. Ground loops are commonly caused when using a daisy chain power cable to power multiple pedals. This creates a ground loop between every pedal in the daisy chain. Ground loops allow stray magnetic fields to introduce hum into your signal path.
If the only type of effect you use is distortion you may not have (or hear) the ill effects. But, if you have modulation and delay pedals the likelihood of ground loops wreaking havoc on your signal is high.
If you don’t plan on using the included power adapter, we recommend an isolated power supply. An isolated supply works by using a transformer (or multiple transformers) to keep every power outlet completely electrically isolated. We offer two fully-isolated, high current DC power supplies, Ojai and Zuma. Click below for more info:
We always work hard to improve the experience our customers have with our products. The release notes below list the new features we’ve added to NightSky and/or issues we’ve resolved. Download the Strymon Update software to update the firmware on your NightSky.
NightSky Firmware REV v1.06 (Released October 2020)
What’s Fixed?
Strymon Non-Transferrable Limited Warranty
Strymon warranties its products and their varying components to be free from defects in material and workmanship for the following periods of time from the original date of purchase when purchased from an Authorized Strymon Dealer:
If the product fails within the warranty period, Strymon will repair or, at our discretion, replace the product at no cost to the original purchaser.
This warranty covers defects in manufacturing discovered while using this product as recommended by Strymon. This warranty does not cover loss or theft, nor does the coverage extend to damage caused by misuse, abuse, unauthorized modification, improper storage, lightning, or natural disasters. Damage caused by any of the above circumstances may result in a non-warranty repair fee.
Products that were purchased from an unauthorized dealer are not covered under warranty. The warranty is non-transferrable and does not cover used or second-hand products.
In the case of malfunction, the purchaser’s sole recourse shall be repair or replacement, as described in the preceding paragraphs. Strymon will not be held liable to any party for damages that result from the failure of this product. Damages excluded include, but are not limited to, the following: lost profits, lost savings, damage to other equipment, and incidental or consequential damages arising from the use, or inability to use this product. In no event will Strymon be liable for more than the amount of the purchase price, not to exceed the current retail price of the product. Strymon disclaims any other warranties, express or implied. By using the product, the user accepts all terms herein.
For North American customers: Contact Strymon through our website at http://www.strymon.net/support for Return Authorization and information. Proof of original ownership may be required in the form of a purchase receipt.
For International Customers: Contact the Strymon dealer from which the product was purchased from in order to arrange warranty repair service.
To locate your nearest authorized Strymon dealer, please use the following link:
You can also contact Strymon directly at (805) 468-8788 or (800) 980-8160 for help finding your nearest authorized Strymon dealer.
Strymon products purchased from an authorized dealer are covered by a manufacturer’s warranty. A purchase receipt from an authorized dealer is required with any request for warranty service.
Please note that any Strymon products that have been purchased from an unauthorized dealer are not eligible for coverage under the manufacturer’s warranty. If you are uncertain, please contact Strymon directly at (805) 468-8788 or (800) 980-8160 before your purchase.
***NOTE: Warranties for Strymon products are non-transferrable. Second-hand items, including sales from websites such as craigslist, Ebay, and Reverb are not covered by a manufacturer’s warranty. Furthermore, there are no authorized dealers on Amazon, Ebay, or Reverb selling “NEW” Strymon products in the USA.***
Your warranty is valid in the region of purchase. For example, if you buy your product in Japan, any service-related issues will need to be handled in Japan. Products purchased in the United States can only be repaired in the United States.
General Inquiries info@strymon.net
Technical Support support@strymon.net
Questions About Orders orders@strymon.net