BigSky support
Download the user manual, read FAQs or contact us if you need more help.
Manuals
Emails

Free US Shipping On Orders Over $49
Easy 30-Day Returns
Financing Available Through ![]()

Each of our Strymon digital effect pedals (excludes OB.1) have the ability to be used with mono or stereo connections. Here are 3 different connection setups you can use with these pedals.
Mono Input => Mono Output
For Compadre, Riverside, and Sunset: Connect a standard mono TS instrument cable into the INPUT and connect a mono TS instrument cable to the OUTPUT of the pedal.
For blueSky and Ola: Connect a mono TS instrument cable into the LEFT INPUT and LEFT OUTPUT for a mono connection.
For BigSky, Mobius, NightSky, TimeLine, and Volante: Connect a mono TS instrument cable into the LEFT INPUT and LEFT OUTPUT for a mono connection. On the TimeLine and Mobius ONLY, make sure that the switch on the back of the pedal is set to STEREO IN/OUT.
For all other Strymon two footswitch Strymon pedals (including Iridium, Zelzah, and V2 pedals with mono/ stereo switch), connect a standard mono TS instrument cable into the INPUT and connect a mono TS instrument cable to the LEFT OUTPUT of the pedal.
Mono Input => Stereo Output
For Mono INPUT and Stereo OUTPUT on our small 2 footswitch pedals: Connect a standard mono TS instrument cable into the INPUT and connect a mono TS instrument cable to both the LEFT and RIGHT OUTPUTS of the pedal. (excludes Compadre, Riverside, and Sunset)
For blueSky and Ola: Connect a mono TS instrument cable into the LEFT INPUT and a mono TS instrument cable to both the LEFT and RIGHT OUTPUTS for stereo output.
For BigSky, Mobius, NightSky, TimeLine, and Volante: Connect a mono TS instrument cable into the LEFT INPUT and both LEFT and RIGHT OUTPUTS for stereo output. On the TimeLine and Mobius ONLY, make sure that the switch on the back of the pedal is set to STEREO IN/OUT.
Stereo Input => Stereo Output
For Stereo input and Stereo output on our small 2 footswitch pedals (except V2 pedals, Iridium, Zelzah, blueSky and Ola), you must first open up the pedal to move the internal jumper over the LEFT 2 pins to set the pedal for TRS Stereo input.
Once the pedal is set for TRS Stereo input, make sure to use a TRS Stereo cable into the INPUT and connect a mono TS instrument cable to both the LEFT and RIGHT OUTPUTS of the pedal.
For blueSky and Ola: Connect a mono TS instrument cable into the LEFT and RIGHT INPUTS along with both LEFT and RIGHT OUTPUTS for stereo input and output. The internal jumper on these pedals does not need to be adjusted to work in stereo and should be left in its default position (connecting the left 2 pins when viewed from below).
For BigSky, Mobius, NightSky, TimeLine, and Volante: Connect a mono TS instrument cable into the LEFT and RIGHT INPUTS along with both LEFT and RIGHT OUTPUTS for stereo input and output. On the TimeLine and Mobius ONLY, make sure that the switch on the back of the pedal is set to STEREO IN/OUT.
For V2 pedals, Iridium, and Zelzah: Using a TRS -> dual TS cable, connect the TRS stereo cable into the input of the pedal, and a mono TS instrument cable to both LEFT and RIGHT OUTPUTS of the pedal. You will need to flip the switch on the back panel of the pedal from MONO to STEREO to enable stereo input.
Note: Your custom name will not be saved unless you save your preset after naming.


If you have a Strymon BigSky, Compadre, Iridium, Mobius, NightSky, Riverside, Sunset, TimeLine, or Volante pedal, you can use MIDI to control or access various parameters and features of the pedal with an external MIDI controller or another device that can send MIDI messages. Please keep in mind that although the MIDI protocol is universal, not all MIDI controllers operate in the same manner or have the same features. Please refer to your MIDI controller’s operation manual for information on how to program the device to only send the MIDI messages you want to your pedals.
For a listing of all the parameters and features you can access via MIDI on our pedals, please refer to the MIDI Specification page at the end of the manual.
BigSky manual – pg. 23
Compadre manual – pg. 13
Iridium manual – pg. 23
Mobius manual – pg. 24
NightSky manual – pg. 15
Riverside manual – pg. 18
Sunset manual – pg. 15
TimeLine manual – pg. 25
Volante manual – pg. 7
Here are several blogs we put together with information on controlling our pedals via MIDI:
Using MIDI to Control Your Strymon Pedals – Part 1
The BigSky reverb pedal has the three reverb types that are available on the blueSky pedal, however, though they both sound great, they have slight sonic differences. One difference is that you can use the Shimmer effect on each of the different reverb types available on that pedal (Plate, Room, and Spring). Also on the blueSky, the Plate reverb with Shimmer has an octave up, and the Spring and Room types have an octave plus a fifth up. On the BigSky, try setting the MODE parameter in the PARAMS menu to REGEN and using either just +Octave or +Octave & 5th settings.
The era based reverbs on the Flint, however, are unique to that pedal and are not found on the BigSky. These reverbs can be set to sound darker than those found on the BigSky and blueSky pedal.
We have tested the Moog EP-2/EP-3, and Mission Engineering EP-25K, and they will all work with our pedals to varying degrees. (There may be others but we haven’t tested them yet.)
We recommend using expression pedals that have a minimum 25k ohm or higher potentiometer such as as the Moog EP-3 or Mission Engineering EP-25k.
To assign the parameter knobs, navigate to any common parameter in BigSky or Mobius, press and hold the VALUE encoder and turn the appropriate parameter button you are assigning to.
Once you have your PARAM 1 or PARAM 2 knobs assigned make sure to save your preset or your settings will be lost.
Please read this FAQ for instructions on how to save presets.

There are two reset procedures available for BigSky, Mobius, and TimeLine. There is a FACTORY PRESET RESET and a GLOBAL SETTINGS reset.
Performing a factory preset reset will erase all custom presets you have saved in your BigSky, TimeLine or Mobius. We only suggest you do this in the event you’d like to take your entire pedal’s presets back to the factory settings.

Performing a Global Settings reset will change all the parameters in the GLOBLS menu back to factory settings.
A PDF of BigSky factory preset settings can be found here.
Please check out the following blog on troubleshooting system noise with your guitar pedals:
Yes, it is possible to update BigSky via MIDI sysex.
The current shipping firmware version is 1.49 (released March 2019). The update file, release notes, and instructions can be downloaded at the following link. Update instructions are included as a PDF with the download. 🙂
Download
Firmware Rev. 1.49 (Released March 2019)
For a list of all firmware revision release notes, please click HERE.
To check the firmware version on your BigSky:
The latest release of the Strymon Update software makes it possible to update the firmware on TimeLine, BigSky, or Mobius directly within the application. Please visit strymon.net/update for information on how to update your pedal to the latest firmware version.
We always work hard to improve the experience our customers have with our products. The release notes below list the new features we’ve added to BigSky and issues we’ve resolved. Download the Strymon Update software to update the firmware on your BigSky.
BigSky Firmware Rev. 1.49 (Released March 2019):
What’s new?
BigSky Firmware Rev. 1.44 (Released November 2017):
What’s new?
MIDI Clock
MIDI Through
Nixie 1.0
What’s fixed?
BigSkyFirmware Rev. 1.23 (Released February 2015)
What’s New:
What’s Fixed:
Firmware Rev. 1.19 (Released June 2014):
What’s Fixed:
Firmware Rev. 1.15 (Released February 2014):
Firmware revision 1.15 is an archived release and is no longer available for download.
What’s New:
What’s Fixed:
If you are having problems updating your BigSky, these tips should help you get going. The most recent BigSky firmware version can be downloaded here.
When connecting two devices via MIDI you typically want to connect the MIDI OUT from one device to the MIDI IN on the other. Some MIDI interfaces label their cables in the opposite manner with “TO MIDI IN” and TO MIDI OUT”. So in this case connect the “TO MIDI IN” to the MIDI IN of your BigSky and the “TO MIDI OUT” to the MIDI OUT of your BigSky.
Many times firmware updates via MIDI won’t play nice with devices that are not dedicated MIDI devices. We recommend performing your MIDI updates using a dedicated MIDI to USB interface. The Roland UM-ONE and Yamaha UX-16 devices are just some that work very well. You may run into problems trying to update through your MIDI jacks on something like an audio interface or keyboard. This is one of the most popular causes of a MIDI update failure.
Try not to use class compliant (plug and play) drivers. These types of device drivers are typically not robust enough to handle even a small firmware update via MIDI. Whenever possible, download the latest and greatest device drivers directly from your MIDI interface’s manufacturer website.
It’s always good to run the latest version of whatever software host you are using for your firmware update. Check the software manufacturer’s websites for new versions frequently to stay up to date.
BigSky requires a power supply that provides 9VDC (center negative) at a minimum of 300mA.
For further information, please see our blog post on powering your effect pedals at the following link:
Gear Guide: Using the Right Power Supply for your Strymon Pedal
Strymon Preset Librarian Download:
Mac » Download
PC » Download
Current Release:
Version: 0.9.4.3
Supported Platforms:
Mac OS X – 10.6.8, 10.7.x, 10.8.x, 10.9.x, 10.10.x
Windows – XP, Vista, 7, 8
For more details on the Librarian software, please visit the Strymon Github page.
Once you have downloaded and installed the Librarian software, you will need to connect your Strymon pedal to a computer using a dedicated MIDI interface that uses developed drivers for your computer’s specific operating system. We recommend the Roland UM-ONE or the Yamaha UX-16.
On most MIDI interfaces, the MIDI OUT cable connects to the MIDI IN port on the pedal and the MIDI IN cable connects to the MIDI OUT port. However, some MIDI interfaces (such as the Roland UM-ONE or the M-Audio MIDI Sport UNO) have arrows or text on the cables to indicate the direction of the data to tell you where to connect the cables to on the pedal.
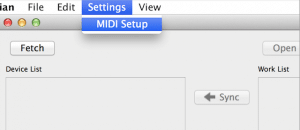
After you have installed the Strymon Librarian software and connected the pedal to your computer through a MIDI interface, launch the Librarian and click on the SETTINGS > MIDI SETUP menu option.
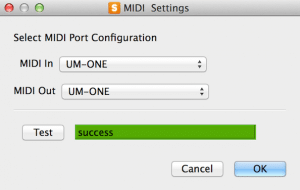
To choose your MIDI IN and OUT Ports and run the connection test. The test bar should turn green and display “success” indicating the software does detect your connected MIDI interface.
You can use the Strymon Preset Librarian software to update the firmware on your pedal to the latest version. Please check out the Strymon Firmware Update page for information on updating your Strymon pedal with the Librarian software.
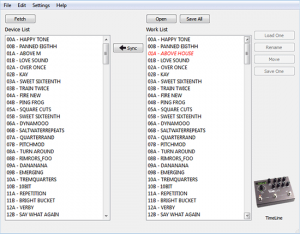
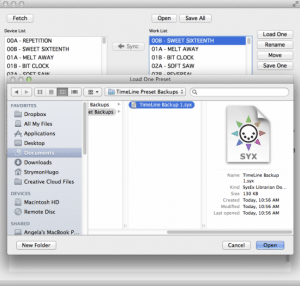
Device List – The Device List is the static representation of what is currently on the connected device. No changes can be made to the Device List. The Device List is populated after performing a FETCH function and all changes made to the Work List will be carried over to the Device List after a SYNC function is performed.
Work List – This is where you make all preset changes in the Strymon Librarian. After changes have been made, a SYNC action will send those changes to the Device List and connected Strymon hardware device.
Fetch – The FETCH button fetches all presets from your connected device and populates the list of presets in the Device List and Work List. This action needs to be done upon each fresh launch of the librarian software.
Sync – A SYNC action will send any changes made from the Work List over to the Device List and connected Strymon hardware. The SYNC button is only active when changes have been made to the Work List.
Open – Click the OPEN button to open and load up entire preset bundles into the Work List of the Strymon Librarian software. Any changes made to the preset bundle that may not have been synced to the device but have been saved before quitting will still be reflected in the preset bundle list.
Save All – The Save All button will save an entire 200 preset bundle list to any specified location on the computer.
Load One – Click the LOAD ONE button to load up individual presets into the Work List of the Strymon Librarian.
Rename – Allows the option to rename any highlighted preset in the Work List. Double clicking on any preset will also bring up the rename window.
Move – Allows the choice to move presets in two different ways:
Device Connected Image – Located at the bottom right hand side of the graphical interface. This confirms that the Strymon device is indeed connected to the Strymon Librarian software.
Settings – Click on the SETTINGS menu option to set up the MIDI hardware device you are using to connect the Strymon pedal to the Strymon Librarian software.
The main Librarian screen features both a Device List and a Work List. All changes are made on the Work List side and can be “synced” up to the hardware device using the <=SYNC button between the two list windows. After you have successfully set up your MIDI interface in the MIDI Settings window, hit the Fetch button to load the presets from your pedal to the Device List and Work List.
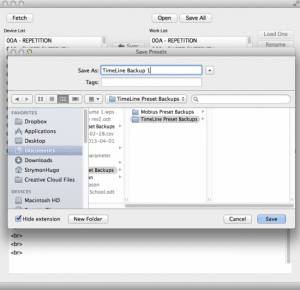
Once the Librarian software has finished loading your presets to the Device and Work lists, you can save all of the presets from your pedal to your computer as single .syx file by clicking the Save All button at the top of the Librarian. A window will popup to specify a location to save the presets to.
You can also use Save One button on the right side of the Librarian to save a single preset from your pedal to your computer. Just highlight a single preset in the Work List, then, click on the Save One button to save that preset to your computer.
To load a single preset or bundled preset file to your pedal, click on the Fetch button to load your pedal’s presets to the Device List and Work List if you have not already done so. (It is important to remember to hit the Fetch button every time you start the Librarian software before managing your presets.) Hit the Open button to load a preset bundle file (.syx) from your computer to the Work List.
Once loaded to the Work List, any presets that are different than what is in the Device List will show as red in the Work List. To load these changes to the pedal’s memory, press the <=Sync button. WARNING: Loading a preset backup file will overwrite ALL of the presets on the device’s memory with the presets from the backup file.
You can also load a single preset to the pedal by clicking on a preset you would like to replace in the Work List to highlight it, then, clicking the Load One button to select the new preset to load to the pedal. The new preset will show as red in the Work List and clicking on the <=Sync button will write this new preset to the pedal’s memory.
If you run into trouble with communicating the Strymon Preset Librarian with your pedal, this is typically due to the MIDI interface being used between the computer and your pedal.
First, make sure to download and install the latest drivers for the MIDI interface from the manufacturer’s website to ensure proper communication with that device.
Also, make sure that your connections are correct: MIDI IN cable to MIDI OUT port and MIDI OUT cable to MIDI IN port. In some cases, the MIDI cable ends tell you where to connect them (TO MIDI IN and TO MIDI OUT, for example).
And if you have any questions about managing your presets, please feel free to send us an email at support@strymon.net. 🙂
All of the inputs and outputs on our pedals use MONO TS unbalanced connections. You can use a TRS cable to plug into the inputs and outputs of the pedals, however, there is no benefit to using TRS balanced cable over a MONO TS instrument cable.
No, we will continue to build both BigSky and blueSky side by side.
Yes, they feature high-impedance inputs and accept up to +8dBu, instrument or line level.
Strymon Non-Transferrable Limited Warranty
Strymon warranties its products and their varying components to be free from defects in material and workmanship for the following periods of time from the original date of purchase when purchased from an Authorized Strymon Dealer:
If the product fails within the warranty period, Strymon will repair or, at our discretion, replace the product at no cost to the original purchaser.
This warranty covers defects in manufacturing discovered while using this product as recommended by Strymon. This warranty does not cover loss or theft, nor does the coverage extend to damage caused by misuse, abuse, unauthorized modification, improper storage, lightning, or natural disasters. Damage caused by any of the above circumstances may result in a non-warranty repair fee.
Products that were purchased from an unauthorized dealer are not covered under warranty. The warranty is non-transferrable and does not cover used or second-hand products.
Products purchased outside of your country (sales channel) have a warranty inside the country it was purchased ONLY and is not valid outside of the country it was purchased. Please contact your dealer for information on warranty and service outside of the USA and Canada.
In the case of malfunction, the purchaser’s sole recourse shall be repair or replacement, as described in the preceding paragraphs. Strymon will not be held liable to any party for damages that result from the failure of this product. Damages excluded include, but are not limited to, the following: lost profits, lost savings, damage to other equipment, and incidental or consequential damages arising from the use, or inability to use this product. In no event will Strymon be liable for more than the amount of the purchase price, not to exceed the current retail price of the product. Strymon disclaims any other warranties, express or implied. By using the product, the user accepts all terms herein.
For North American customers: Contact Strymon through our website at https://www.strymon.net/support for Return Authorization and information. Proof of original ownership may be required in the form of a purchase receipt.
For Customers Outside the USA and Canada: Contact the Strymon dealer from which the product was purchased from in order to arrange warranty repair service.
To locate your nearest authorized Strymon dealer, please use the following link:
You can also contact Strymon directly at (805) 468-8788 or (800) 980-8160 for help finding your nearest authorized Strymon dealer.
Strymon products purchased from an authorized dealer are covered by a manufacturer’s warranty. A purchase receipt from an authorized dealer is required with any request for warranty service.
Please note that any Strymon products that have been purchased from an unauthorized dealer are not eligible for coverage under the manufacturer’s warranty. If you are uncertain, please contact Strymon directly at (805) 468-8788 or (800) 980-8160 before your purchase.
***NOTE: Warranties for Strymon products are non-transferrable. Second-hand items, including sales from websites such as craigslist, Ebay, and Reverb are not covered by a manufacturer’s warranty. ***
Your warranty is valid in the region of purchase. For example, if you buy your product in Japan, any service-related issues will need to be handled in Japan. Products purchased in the United States can only be repaired in the United States.
