Timeline MX Support
Manuals
Emails
Frequently Asked Questions
Usage
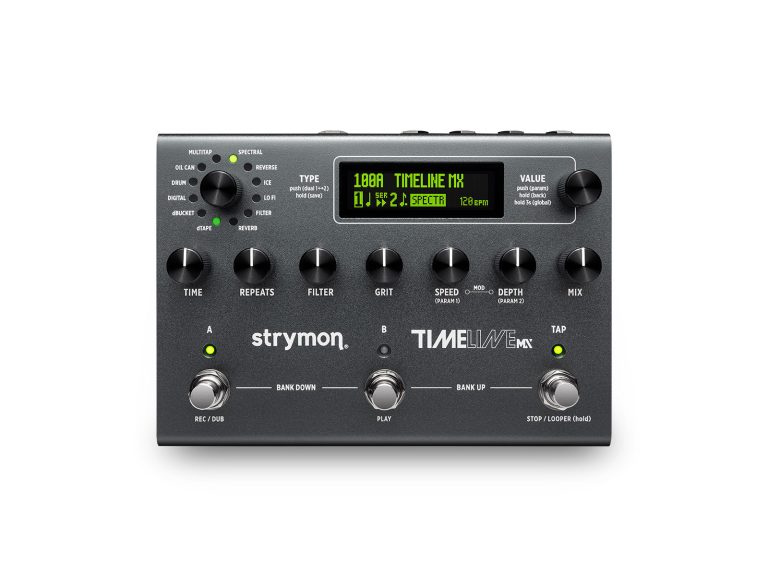
TimeLine MX is capable of running two distinct delay algorithms at a time on a single preset. These delays can be run in Series (delay 1 -> delay 2/ delay 2 -> delay 1), Parallel (both delays process simultaneously), or Left and Right split (delay 1 -> left output, delay 2 -> right output).
Using the Footswitch Mode setting (FOOTSW MODE, as labeled in the GLOBAL settings), the A and B switches on TimeLine MX will toggle Delay 1 and Delay 2 on a specific preset. For example, pressing the A + B footswitches will allow you to select the A or B preset in that bank. Pressing the B footswitch will recall the B preset in that bank. After doing so, the A footswitch will engage or bypass delay 1, and the B footswitch will engage or bypass delay 2.
TimeLine MX’s EXP port can be configured for a variety of uses, utilizing the EXP MODE Global setting:
PEDAL– For use with an external expression pedal for control of TimeLine MX’s knobs (TRS, 25k Ohm potentiometer minimum).
BANK– For use with an original Strymon MultiSwitch or a MultiSwitch Plus set to “TimeLine, BigSky, and Mobius mode”.
- Footswitch A: Bank Down
- Footswitch B: Toggles between the A and B presets of the current bank
- Footswitch C: Bank Up
PRESET– For use with an original Strymon MultiSwitch or a MultiSwitch Plus set to “TimeLine, BigSky, and Mobius mode”.
- Footswitch A: Preset Down
- Footswitch B: Bypasses/ engages the currently loaded preset
- Footswitch C: Preset Up
LOOPER– For use with an original Strymon MultiSwitch or with a MultiSwitch Plus set to “TimeLine, BigSky, and Mobius mode”. The MultiSwitch device’s footswitches can access six Looper functions, depending on whether TimeLine MX is set to Looper mode or not (press and hold TAP for 3 seconds to enter Looper mode).
- Footswitch A: Looper Record/ Overdub. When in Looper mode: Reverse-Forward play toggle
- Footswitch B: Looper Play. When in Looper mode: Half-speed, Full-speed toggle
- Footswitch C: Looper Stop. When in Looper mode: Undo/ Redo toggle
TAP– For use with an original Strymon MultiSwitch, or with a MultiSwitch Plus set to “TimeLine, BigSky, and Mobius mode”
- Footswitch A: Preset Down
- Footswitch B: Sets tap tempo for the current preset
- Footswitch C: Preset Up
Alternatively, TAP can be controlled via an individual switch, using an original Strymon MiniSwitch or using a MultiSwitch Plus set to “Three Independent Switches” or “Combo” mode.
- With Three Independent Footswitches mode, use any one of the
MultiSwitch Plus switches set to TAP mode. - With Combo mode, use the MultiSwitch Plus footswitch C set to
TAP mode.
1BTN LOOP– For use with a Strymon MiniSwitch or other single, momentary type switch that uses a TRS connection.
MIDI: For use with an external MIDI controller (TRS MIDI) for preset access and parameter control or preset changes. Alternatively, for use with a Strymon MultiSwitch Plus set to “Preset mode” to recall three specific presets. The MultiSwitch Plus device’s footswitches perform the following functions:
- Footswitch A: Loads preset 0B
- Footswitch B: Loads preset 1A
- Footswitch C: Loads preset 1B
An expression pedal can be used to control any combination of knobs on TimeLine MX. The specific knobs which the expression pedal will control are saved on a per-preset basis. This means that each preset can be configured to control a completely different set of knobs.
- To configure your TimeLine MX for expression mode, press and hold the VALUE encoder for 2 seconds to enter the GLOBAL settings menu. Turn the VALUE knob to select EXP MODE, then press VALUE to display options. Turn the VALUE encoder again to select PEDAL, then press the VALUE encoder to commit the setting.
- Connect your expression pedal to the EXP port on TimeLine MX via a TRS cable.
- On the Home screen, press the VALUE encoder to enter the PARAM menu for the preset. Turn VALUE to select the 1+2 EXP Setup option and press VALUE to enter the setup options screen.
- Within the EXP Setup screen, the MIDI EXP ON/OFF setting is initially selected and set to ON by default, as indicated by the double arrows in the display on the pedal. No change is necessary for this ON setting.
- While the EXP Setup screen is displayed, rock the connected expression pedal fully to its minimum “heel” position. Double-arrows appear to the right of the HEEL parameter, indicating it is ready to learn the knob and value to be assigned. Turn the knob intended to be controlled, such as MIX in this example, and set the knob value desired to be used as the pedal’s HEEL (minimum) value.
- Rock the expression pedal fully to its maximum “toe” position. The double-arrows will now appear to the right of the TOE parameter. Turn the MIX knob to set the preferred TOE (maximum) value.
- Once the above settings are made, the pedal assignments are configured. Press and hold the VALUE encoder for 1 second to back
out of the EXP Setup and PARAM screens and start using the pedal with the configured preset.
*NOTE: Save the preset to retain its expression pedal settings. Pedal assignment settings are stored individually per preset.
*NOTE: The EXP Setup is a “shared” 1+2 type that can control parameters for both Delay 1 and 2. Once a knob is assigned to the expression pedal, it will control this knob for only the delay in focus, unless otherwise set. To control the same parameter for the other delay, press TYPE to change the delay focus when first assigning the “Heel” position setting, then do the same for both Delay 1 and 2 on the “Toe” setting.
MultiSwitch Plus (or original MultiSwitch) have 4 distinct modes of operation with TimeLine MX. To configure your MultiSwitch for use with TimeLine MX:
- Press and hold the VALUE encoder for 2 seconds to enter the Global Settings (GLOBAL) menu.
- Turn VALUE to EXP MODE, press VALUE, and then select the preferred functionality.
- Connect one end of a 1/4 inch, TRS-to-TRS cable to the TimeLine MX EXP jack.
- Connect the other end of the TRS cable to the MultiSwitch TRS input.
- The connected MultiSwitch should now perform the selected Bank, Preset, Looper, or Tap TimeLine MX control functions.
To configure your TimeLine MX for MultiSwitch Plus, press and hold the VALUE encoder for 2 seconds to enter the Global Settings (GLOBAL) menu, then turn VALUE to select and configure the following individual settings:
- Set MIDI CHANNEL to Channel 1 (factory default)
- Set EXP MODE to the desired option
- Set MIDI THRU to MERGE
The different modes and functionality for each footswitch are:
- BANK: Bank Down// Preset A/B toggle// Bank Up
- PRESET: Preset Down// Bypass/ Engage// Preset Up
- LOOPER
3a. Normal Mode: Record/ Dub// Play// Stop
3b. Looper Mode: Reverse/ Forward// Half/ Full Speed// Preset Up - TAP: Preset Down// TAP Tempo// Preset Up
The onboard TAP footswitch can be set as a simple “1 Button” interface for the looper. With this setting, a looper is always available for quick and simple looper needs with the press of the TAP switch. The A and B footswitches can still be used to navigate presets and banks.
- Engaging 1 Button Looper Mode– Press and hold the TYPE encoder for three seconds to enter the GLOBAL menu, select TAP FOOTSW, and choose LOOPER to set the TAP footswitch to control the 1 Button Looper.
- Recording a Loop– To record, press the TAP switch once. The switch’s LED lights solid RED and the flashing Recording icon appears on the Home screen.
- Playing a Loop– When actively recording or overdubbing, or when the looper is stopped with a loop in memory, press TAP once. Its LED lights solid GREEN, the screen’s animated Play icon shows the loop progress. To stop playback, press TAP twice quickly.
- Overdubbing a Loop– Overdubbing can be started while playing a recorded loop. While the loop is playing, press TAP once. The TAP LED lights solid AMBER and the flashing Overdub icon appears on the Home screen. This keeps recording another layer on top of the initial recorded loop until either Stop (press TAP twice rapidly) or Play (press TAP once) is engaged.
- Stopping a Loop– When actively recording, playing, or overdubbing, press TAP twice rapidly to stop. The TAP LED turns off and the Stop icon appears on the screen. To start playback, press TAP once.
- Clearing a Loop– Once a loop has been recorded, from any Looper state, press and hold TAP for approximately 3 seconds to permanently delete the loop from memory. While holding TAP, wait for the Clear icon to flash twice. Once cleared, the No Loop icon will appear. A new loop can then be recorded when desired.
The 1 Button Looper can also be used in the same way as described below with a Strymon MiniSwitch when your GLOBAL > EXP MODE setting is set to 1BTNLOOOP. When using MiniSwitch in this way, you may want to set the GLOBAL > TAP FOOTSW to TAP, to allow TimeLine MX’s onboard TAP footswitch to operate as a tap tempo switch.
TimeLine MX can send and receive MIDI via the 5-pin DIN input and output, USB-C, or TRS (tip receive, ring send) MIDI through the EXP port. To use TRS MIDI, enter your GLOBAL menu by pressing and holding the VALUE encoder. Release the encoder, then scroll to EXP MODE, press the VALUE encoder again, and scroll to MIDI. Your TimeLine MX’s EXP port is now configured for TRS MIDI.
TimeLine MX will respond to MIDI CC and MIDI PC messages, as well as MIDI clock. MIDI CC messages are used to change any of the controls on the pedal, whereas MIDI PC messages are used to change presets. Keep in mind that MIDI clock is enabled on a per-preset basis, and you will need to set MIDI CLOCK to ON in your PARAMS menu, and then save your preset, for any preset you’d like to use MIDI clock with.
A full list of TimeLine MX’s MIDI CC functions and numbers can be found on pages 95-101 of the product manual here.
TimeLine MX can optionally be set for different Input and Output jack routing configurations via Global Settings. To select a
configuration, hold VALUE for 2 seconds to enter the GLOBAL menu, choose I/O Config, then select the desired option.
Normal Configuration– The default Normal configuration offers mono or stereo input and output, determined by the jack connections.
- Input: Connect to the LEFT IN only for mono input. Connect to both the LEFT and RIGHT IN for stereo input.
- Output: Connect to the LEFT OUT only for mono output. Connect to both the LEFT and RIGHT OUT for stereo output.
NOTE– if you intend to send mono in to the pedal and use the RIGHT IN, the pedal will assume stereo input, and route the left input to the left output, and vice versa. This will result in signal loss, as there is no input signal to be routed to the right output.
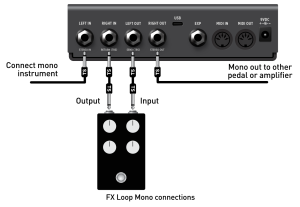
FX Loop Mono and FX Loop Stereo Configurations– These options allow the RIGHT IN and LEFT OUT to function as a mono or stereo FX Loop for connecting external effects, where the TimeLine MX’s wet signal is processed through them. Note that specific cable connections are required for mono vs. stereo.
- FX Loop Mono: All INs and OUTs are mono. Use standard, Tip-Sleeve (TS) instrument type cables for all connections.
- FX Loop Stereo: Use Tip-Ring-Sleeve (TRS) connections to all TimeLine MX’s IN and OUT jacks for stereo. If using a pedal with dual 1/4″ TS inputs or outputs, it will be necessary to use a TRS -> dual TS splitter. In this instance, the TRS side of the cable would connect to TimeLine MX, and the dual TS connections would connect to the left and right jacks on the looped pedal.
NOTE– For TRS connections, the left channel (hot) is carried on the Tip, the right channel (hot) on the Ring, and the Sleeve is common ground.
Wet Dry and Wet Dry Wet Configurations– These options provide the “dry” (unprocessed) input and the “wet” (processed) signals to be routed discretely, such as to two or three amplifiers or mixer channels.
- Wet Dry: The LEFT OUT is a mono, dry-only signal output and the RIGHT OUT is a mono, wet-only output.
- Wet Dry Wet: The LEFT OUT is a mono, dry-only signal output and the RIGHT OUT is a stereo wet-only output. A TRS connection to the RIGHT OUT is required for stereo.
Not all algorithms on TimeLine MX process stereo signal in the same way. The following algorithms process in “true stereo”, meaning that the left input and right input are processed directly to their respective outputs without any summing:
- dTape
- Digital
- Oil Can
- Multitap
- Reverse
- Lo-Fi
- Filter
- Ice
The following algorithms sum the input signal to mono, then create stereo fields from the summed input. This is necessary to create a wider feeling stereo field:
- dBucket
- Drum
- Spectral
- Reverb
Most, but not all TimeLine MX delay types provide the same Delay Time range. Therefore, the case can arise where the current Delay TIME or TAP setting, in combination with some TAP Division settings, can be out of the range for the current delay type. For example, the dBUCKET delay, true to the analog architecture it is based on, has a narrower range than most delay types (80 to 800 milliseconds). Therefore, if the Delay Time is set to greater than 800 ms with a Quarter Note TAP Division, this exceeds its Time range, and the repeats heard will likely not be in sync with the current Tap Tempo. When this type of “out of tempo range” situation occurs, an exclamation indicator is displayed on the Delay “1” or “2” selector.
If desired, turn the TIME knob to set a new tempo for the preset, and/or change the TAP Division parameter for the individual delay type to bring it within its available Time range. The Time ranges per Delay Type are listed below.
- dTape: 60 – 2500ms
- dBucket: 60 – 800ms
- Digital: 60 – 2500ms
- Drum: 200 – 2000ms
- Oil Can: 200 – 800ms
- Multitap: 60 – 2500ms
- Spectral: 60 – 2500ms
- Reverse: 60 – 2500ms
- Ice: 60 – 2500ms
- Lo Fi: 2 – 2500ms
- Filter: 60 – 2500ms
- Reverb: 2 -2500ms Pre-Delay, 40+ seconds Decay
Specs
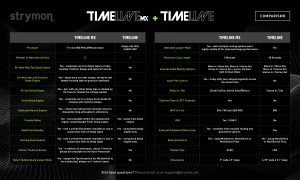
While the original TimeLine is already capable of so much, TimeLine MX received a full suite of upgrades and functionality additions that help it do even more.

With the addition of the Drum, Multitap, Oil Can, Spectral, and Reverb delays found in TimeLine MX, we decided to remove the older delay algorithms, and instead implement their functionality in other ways. Duck and Swell, for example, are now Param settings that can be used on ANY delay algorithm.
Now that any two delays can be used in dual delay configuration, the Dual delay algorithm is obsolete.
The Multitap delay engine is a far more comprehensive version of the Pattern delay, and allows for near infinite delay patterns.
Trem has been added to the Filter delay engine, and allows for far greater usage of modulation and filtering in the delay lines.
TimeLine MX does not ship with a power supply. TimeLine MX requires an isolated, 9VDC center negative power supply that provides a minimum of 500mA of current.
TimeLine MX requires an isolated, 9VDC center negative power supply that provides a minimum of 500mA of current.
Warranty
Strymon Non-Transferrable Limited Warranty
Warranty
Strymon warranties its products and their varying components to be free from defects in material and workmanship for the following periods of time from the original date of purchase when purchased from an Authorized Strymon Dealer:
- Effects Pedals
- 2 Years – BigSky MX, blueSky v2, Brig, Cloudburst, Compadre, Deco v2, DIG v2, EC-1, El Capistan v2, Flint v2, Iridium, Lex v2, NightSky, Riverside, Sunset, Ultraviolet, Volante, Zelzah
- 1 Year – BigSky, blueSky, Brigadier, Deco, DIG, El Capistan, Flint, Lex, Mobius, OB.1, Ola, Orbit, TimeLine
- Eurorack Modules
- 2 Years – AA.1, Magneto, StarLab
- Power Supplies
- 5 Years – Zuma, Zuma R300, Ojai, Ojai R30
- 1 Year – Factory power supplies for pedals
- Accessories
- 3 Years – PCH
- 2 Years – Conduit
- 1 Year – MiniSwitch, MultiSwitch Plus, original MultiSwitch, MIDI EXP Cables, DC Power Cables, EIAJ-05 Link Cables, 24V Power Adapter for Ojai/Ojai R30, Polarity Reversal Adapters, Voltage Doubler Adapters, Daisy-Chain Power Cables
If the product fails within the warranty period, Strymon will repair or, at our discretion, replace the product at no cost to the original purchaser.
Exclusions
This warranty covers defects in manufacturing discovered while using this product as recommended by Strymon. This warranty does not cover loss or theft, nor does the coverage extend to damage caused by misuse, abuse, unauthorized modification, improper storage, lightning, or natural disasters. Damage caused by any of the above circumstances may result in a non-warranty repair fee.
Products that were purchased from an unauthorized dealer are not covered under warranty. The warranty is non-transferrable and does not cover used or second-hand products.
Products purchased outside of your country (sales channel) have a warranty inside the country it was purchased ONLY and is not valid outside of the country it was purchased. Please contact your dealer for information on warranty and service outside of the USA and Canada.
Limits of Liability
In the case of malfunction, the purchaser’s sole recourse shall be repair or replacement, as described in the preceding paragraphs. Strymon will not be held liable to any party for damages that result from the failure of this product. Damages excluded include, but are not limited to, the following: lost profits, lost savings, damage to other equipment, and incidental or consequential damages arising from the use, or inability to use this product. In no event will Strymon be liable for more than the amount of the purchase price, not to exceed the current retail price of the product. Strymon disclaims any other warranties, express or implied. By using the product, the user accepts all terms herein.
How to Obtain Service Under this Warranty
For North American customers: Contact Strymon through our website at https://www.strymon.net/support for Return Authorization and information. Proof of original ownership may be required in the form of a purchase receipt.
For Customers Outside the USA and Canada: Contact the Strymon dealer from which the product was purchased from in order to arrange warranty repair service.
To locate your nearest authorized Strymon dealer, please use the following link:
You can also contact Strymon directly at (805) 468-8788 or (800) 980-8160 for help finding your nearest authorized Strymon dealer.
Strymon products purchased from an authorized dealer are covered by a manufacturer’s warranty. A purchase receipt from an authorized dealer is required with any request for warranty service.
Please note that any Strymon products that have been purchased from an unauthorized dealer are not eligible for coverage under the manufacturer’s warranty. If you are uncertain, please contact Strymon directly at (805) 468-8788 or (800) 980-8160 before your purchase.
***NOTE: Warranties for Strymon products are non-transferrable. Second-hand items, including sales from websites such as craigslist, Ebay, and Reverb are not covered by a manufacturer’s warranty. ***
Your warranty is valid in the region of purchase. For example, if you buy your product in Japan, any service-related issues will need to be handled in Japan. Products purchased in the United States can only be repaired in the United States.